In the Track application, an organization is defined as either a host company’s department or a vendor company. Track requires grouping resource records by an organization. Once an organization is created and is active, it can be accessed through Track under the Organization drop-down list, providing the user has the security rights to view the organization.
Hover a mouse pointer over the Settings menu on the menu bar to display its drop-down menu.
Slide a mouse pointer over the Organizations option to display its menu.
Click Organizations to open the Organizations screen.
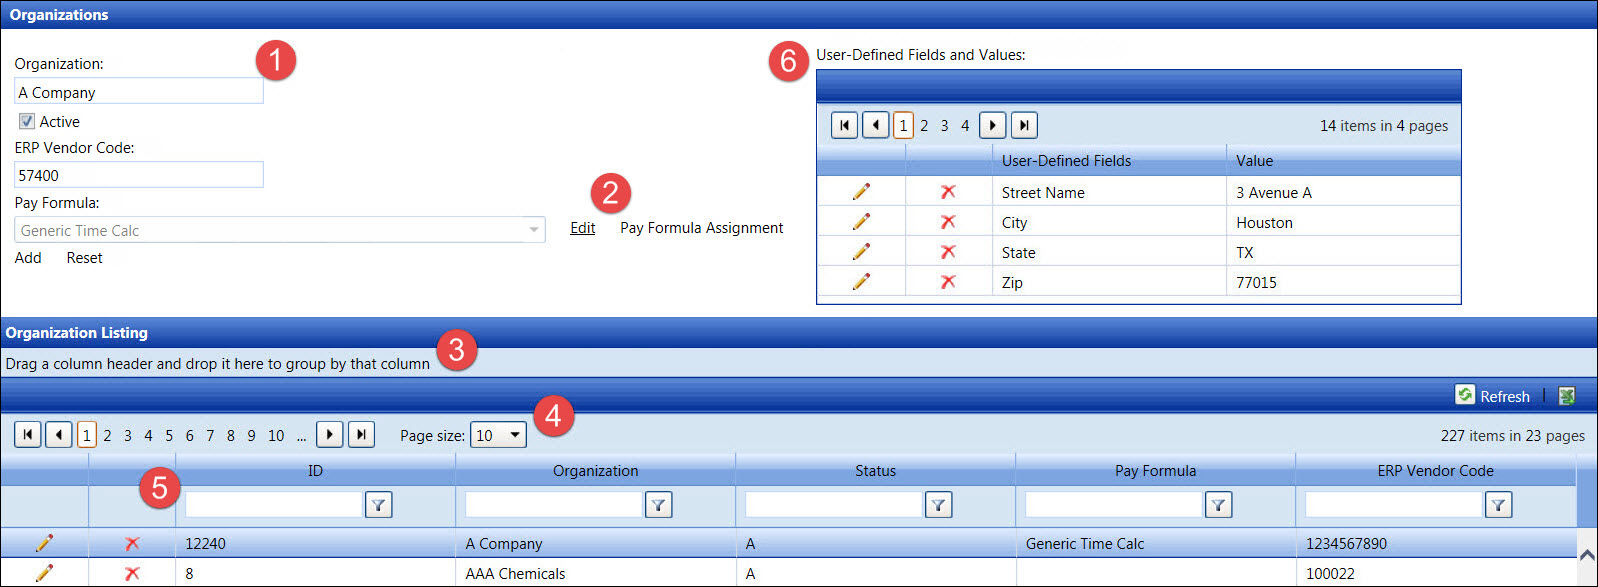
Text boxes and drop-down lists are available for entering a new organization or edit an existing organization.
Click
the Edit link to open the
Pay Formula screen. (see also Add a
New Pay Formula)
Click the Pay Formula Assignment
link to open the Pay Formula Assignment screen. (see also Pay Formula Assignment)
Group the organization listing by a column header. (see also Group Items by Column Header)
View number of records per page, or select a number of records to display per page. (see also View by Page icons and Page Size drop-down list)
Filter the search option to minimize the organization listing. (see also Filter option)
Add or edit the organization's user-defined fields and values.
If applicable, select a location from the Location drop-down list located at the menu bar.
From the Organizations screen, enter a new organization name into the Organization text box.
The Active checkbox is selected by default. If an organization has an inactive status, click the Active checkbox to uncheck it.
ERP vendor code maybe assigned when adding a new organization or it may come from the Access Control System (ACS). If it comes from ACS, do not add or edit vendor code from Track as the ACS will overwrite it. If applicable, enter the ERP vendor code into the ERP Vendor Code text box.
The Pay Formula field is displayed as read-only. If there is a pay formula assigned at the organization level, click the Pay Formula Assignment link to open the Pay Formula Assignment screen. Refer to Pay Formula Assignment to assign a pay formula to an organization.
Click Add to save and display a new organization and its information in the Organization Listing.
From the Organization Listing, click the Edit icon on a line item to display the selected organization information and user-defined fields and values.
Make the changes to the organization's information then click the Update icon to save the modifications.
Disclaimer: Do not include any personally identifiable information or personal data when entering information into the User Defined Field's Value text boxes. Management Controls, INC. (MCi) cannot be held responsible for any information in the User Defined Field's Value text boxes on any Track screens.
From the Organization Listing, click an organization to display the selected organization's user-defined fields and values.
From the User-Defined Fields and Values table, click the Edit icon a line item to enable the text box under the Value column.
Enter or edit the information in the appropriate text box.
Click the Update icon to save the changes.
Repeat the steps to enter or edit other user-defined information, or click the appropriate icon to view the user-defined fields and values on a different page. (see also View by Page icons and Page Size drop-down list)
An organization cannot be deleted if one or more resources are assigned to it.
From the Organization Listing, click the Delete icon on a line item. The delete confirmation pop-up message appears.
Click OK to delete the selected organization.
From the Organization Listing, click an organization to highlight the selected organization and display its user-defined information in the User-Defined Fields and Values table.
From the User-Defined Fields and Values table, click the Delete icon a line item. The delete confirmation pop-up message appears.
Click OK to delete the selected user-defined information.